Deleting Hardware: Difference between revisions
From PLC Wiki
(Created page with "------- To remove hardware: * Select the hardware from the dashboard that you wish to delete or remove. * Click the "Delete Hardware" button to remove the selected hardware from the system. For multiple entries, Swift Gate deletes them in reverse order of addition. The deletion process begins with the most recently added hardware and works backward, ensuring a clean and organized removal of devices.") |
No edit summary |
||
| Line 3: | Line 3: | ||
* Select the hardware from the dashboard that you wish to delete or remove. | * Select the hardware from the dashboard that you wish to delete or remove. | ||
[[File:Delete hardware button.png]] | |||
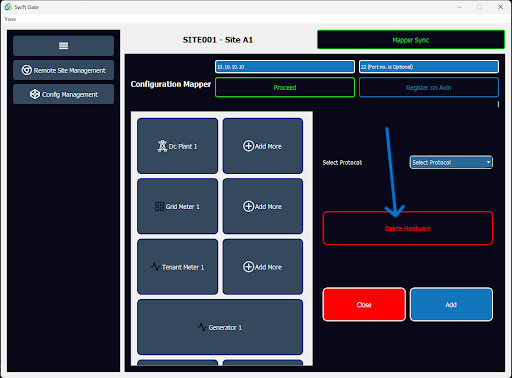
* Click the "Delete Hardware" button to remove the selected hardware from the system. | * Click the "Delete Hardware" button to remove the selected hardware from the system. | ||
For multiple entries, Swift Gate deletes them in reverse order of addition. The deletion process begins with the most recently added hardware and works backward, ensuring a clean and organized removal of devices. | For multiple entries, Swift Gate deletes them in reverse order of addition. The deletion process begins with the most recently added hardware and works backward, ensuring a clean and organized removal of devices. | ||
Revision as of 12:53, 12 December 2024
To remove hardware:
- Select the hardware from the dashboard that you wish to delete or remove.
- Click the "Delete Hardware" button to remove the selected hardware from the system.
For multiple entries, Swift Gate deletes them in reverse order of addition. The deletion process begins with the most recently added hardware and works backward, ensuring a clean and organized removal of devices.
